
I’ve recently been dealing with an out-of-memory (OOM) issue on my AWS Lightsail instance. I don’t want to upgrade my plan and would rather stay within my current budget, so I looked for a way to work around it instead. If you’re in the same situation, this blog is for you.
If you’re running a small VPS — like an AWS Lightsail 1GB instance or a similar low-tier DigitalOcean Droplet — and you’re hosting resource-hungry services like MySQL, Nginx, Apache, or PHP-FPM together, you may have run into the same frustrating issue:
- The server becomes unreachable over SSH
- CPU burst percentage looks completely normal
- The only fix is a full stop and start of the instance (not just a reboot)
This is a classic symptom of memory exhaustion, and one of the simplest, safest fixes is adding swap space. This post explains what swap is, why low-tier instances need it, how to set it up, and how to fully reverse it if needed.
Why This Happens
Small VPS plans (512MB–1GB RAM) often ship with no swap configured by default — this is true for both AWS Lightsail and DigitalOcean Droplet. That’s fine if you’re running a single lightweight service, but the moment you stack multiple memory-hungry processes together, things get tight fast:
- MySQL 8 — has a memory-hungry default configuration (InnoDB buffer pool, performance schema, etc.)
- Nginx or Apache — normally lightweight, but Apache in particular can spawn multiple worker processes that add up
- PHP-FPM (common with WordPress) — each worker process consumes its own chunk of RAM, and default pool settings often assume more RAM than a 1GB box actually has
When combined memory usage creeps toward the limit and there’s no swap to fall back on, the Linux kernel’s OOM (Out-Of-Memory) killer starts terminating processes to free RAM. In less severe cases, this kills a single process (like a PHP-FPM worker) and things recover. In more severe cases, memory pressure gets bad enough that the entire network stack can hang — leaving the instance “running” in your provider’s dashboard, but completely unreachable over SSH, sometimes requiring a full stop/start of the instance to recover.
What Swap Actually Does
Swap is disk space set aside to act as overflow for RAM. When physical memory fills up, the kernel moves inactive memory pages to swap, freeing up RAM for active processes. It’s not a replacement for RAM — it’s slower than RAM since it lives on disk — but it acts as a safety buffer that gives the kernel breathing room instead of hitting a hard wall and killing processes abruptly or freezing entirely.
Important: swap is a mitigation, not a cure. If your services genuinely need more memory than your plan provides, swap will delay the problem and add latency rather than solve it outright. Think of it as insurance while you right-size your services, not a permanent fix for an undersized instance.
A Quick Side Note: This Is the Same Concept as “RAM Plus” on Your Phone
If you’ve seen a setting on your Android phone called RAM Plus, Extended RAM, or something similar (common on Motorola, Samsung, Xiaomi, OnePlus, Vivo, and other brands), you’ve already used this exact concept without realizing it. Android is Linux-based, so it uses the same underlying mechanism: it sets aside a portion of your phone’s storage and uses it as overflow when RAM fills up, letting the system offload inactive memory to storage instead of crashing or shutting down apps.
It’s the same idea as server swap, just tuned differently — phone storage swap happens far more often (every time you switch apps), so manufacturers keep it conservative and cap it at a few GB to manage wear on the flash storage. On a server, we’re using it more defensively, as a buffer against an out-of-memory crash. Different context, same underlying trick: turning spare storage into a memory safety net.
How to Add Swap (Safe, Reversible, No Downtime)
This works on most Linux distributions, including Ubuntu and Debian-based Lightsail/Droplet images. It doesn’t touch your existing filesystem, application files, or databases — it just creates one file and enables it.
1. Check available disk space first
df -h /A 1–2GB swapfile is trivial for most instances (aim to keep well over that free), so this step is just a sanity check.
2. Create and enable the swapfile
sudo fallocate -l 2G /swapfile
sudo chmod 600 /swapfile
sudo mkswap /swapfile
sudo swapon /swapfile3. Make it persist across reboots
echo '/swapfile none swap sw 0 0' | sudo tee -a /etc/fstab4. Tune swappiness (optional but recommended)
By default, Linux may use swap more eagerly than you’d like. Lowering swappiness tells the kernel to treat swap as a last resort rather than routine overflow — better for performance and reduces unnecessary disk writes:
sudo sysctl vm.swappiness=10
echo 'vm.swappiness=10' | sudo tee -a /etc/sysctl.conf5. Verify it’s active
free -h && swapon --showYou should see your swap total reflected instead of 0B.
Before Swap:

After Swap:

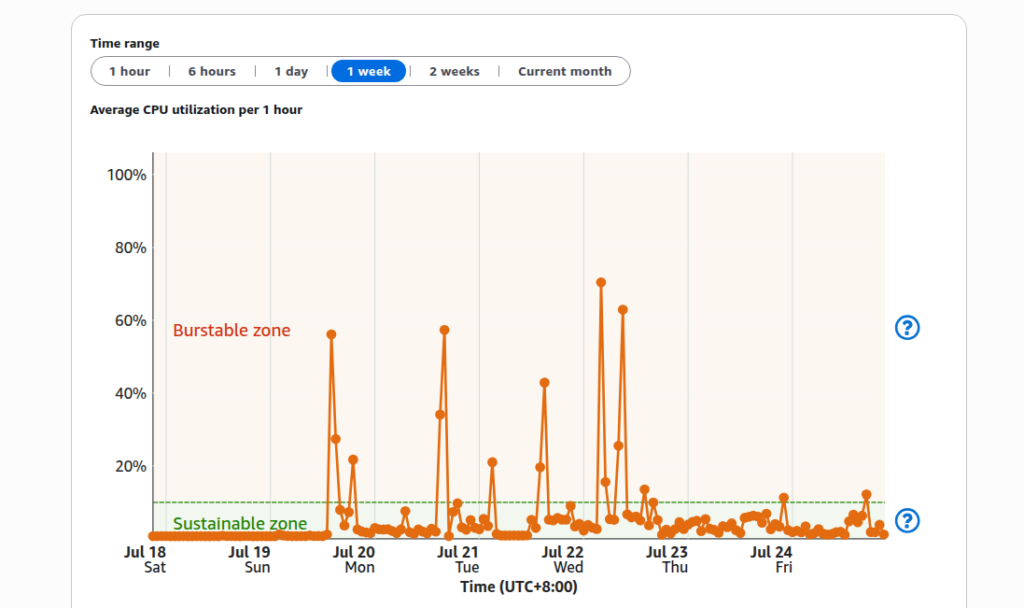
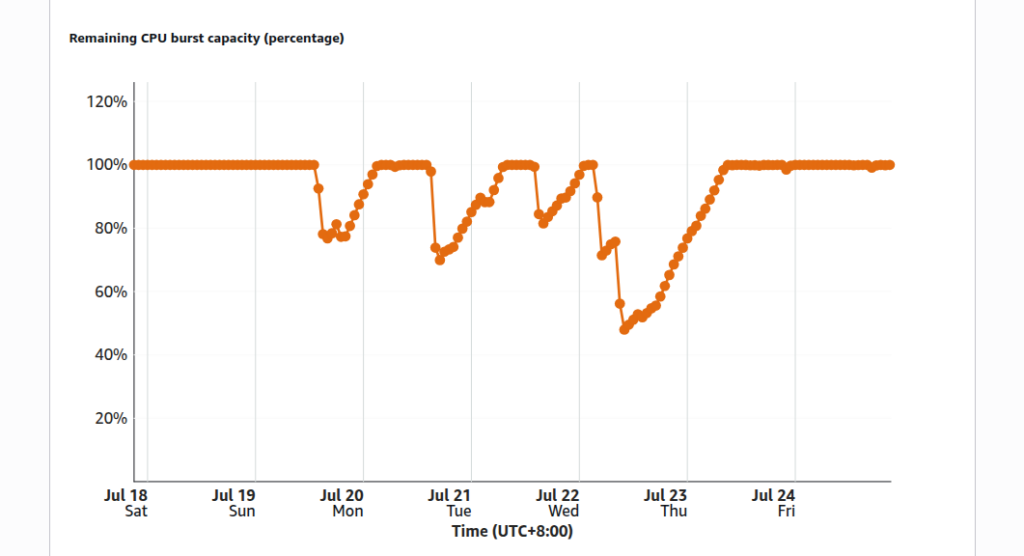
Here are my AWS Lightsail metrics. On July 20, I installed Nginx, MySQL, and PHP-FPM on my Lightsail instance. As you can observe, I started experiencing unusual spikes and OOM (out-of-memory) crashes shortly after the installation. On July 23, I implemented swap to fix the memory exhaustion, and since then, the metrics have stabilized, staying under the 60% burstable zone, with my remaining CPU burst capacity holding steady at 100%.
How Much Swap Should You Add?
There’s no universal magic number — this is guidance, not a hard rule:
| RAM size | Suggested swap |
| Up to 2GB | 1–2x RAM |
| 2–8GB | Equal to RAM |
| Over 8GB | 4–8GB is usually enough |
On very tight instances (911MB–1GB RAM), it’s reasonable to add slightly more than a strict 1:1 ratio, since disk space is typically cheap and plentiful even on small plans. Just don’t go overboard — heavy sustained swapping, rather than occasional overflow, is a sign you actually need more RAM, not more swap.
How to Reverse It (Fully, Cleanly)
If you want to remove swap entirely — for testing, after upgrading your instance’s RAM, or any other reason — this fully undoes everything with no leftover trace:
sudo swapoff /swapfile
sudo rm /swapfile
sudo sed -i '/\/swapfile/d' /etc/fstab
sudo sed -i '/vm.swappiness/d' /etc/sysctl.conf
sudo sysctl vm.swappiness=60This deactivates swap, deletes the file, removes the fstab entry, removes the custom swappiness setting, and resets swappiness back to the Linux default (60). Nothing about your applications, databases, or configs outside of this is touched.
Swap Is a Patch, Not a Permanent Fix
If you’re running WordPress + MySQL + Nginx/Apache + PHP-FPM on a 512MB–1GB instance, swap will help you avoid hard freezes, but it won’t make a fundamentally undersized box perform well under real traffic. Pair it with:
- Capping MySQL’s memory usage (e.g., lowering innodb_buffer_pool_size, disabling performance_schema if unused)
- Limiting PHP-FPM worker counts (pm.max_children) to match your actual RAM
- Monitoring memory over time (free -h, or a simple cron job logging usage) so you catch pressure building up before it causes an outage
If you’ve done all of that and you’re still hitting the ceiling regularly, that’s a strong signal it’s time to upgrade to a higher-RAM plan rather than continuing to tune around a hard resource limit. Swap buys you stability and time — it doesn’t create memory that isn’t there.
Summary
- Low-tier VPS plans (AWS Lightsail, DigitalOcean Droplet, etc.) often ship with no swap by default
- Running MySQL + Nginx/Apache + PHP-FPM together on 512MB–1GB RAM can lead to memory exhaustion, sometimes severe enough to freeze the instance’s network stack entirely
- Adding swap is safe, reversible, and takes about two minutes, with no downtime
- Swap is a safety net for spikes, not a substitute for adequate RAM — treat memory tuning and, if needed, a plan upgrade as the real long-term fix
